Django provides a simple-to-code solution to edit your model in an HTML form if you use its class-based generic editing view such as UpdateView. You can see a sample implementation of this in my article, Editing A Single Model Instance with UpdateView. However, in the real world, a complex application may want to support more than one HTML form on a webpage. Take for instance, a complicated job application that normally asks a lot of questions from various sources on a single page. I have seen webpages that have multiple save buttons corresponding to different sections on the page. Beneath the hood, each save button corresponds to a particular HTML form and we can achieve that with Django as well. Today, I am going to document how to implement multiple forms on a webpage.
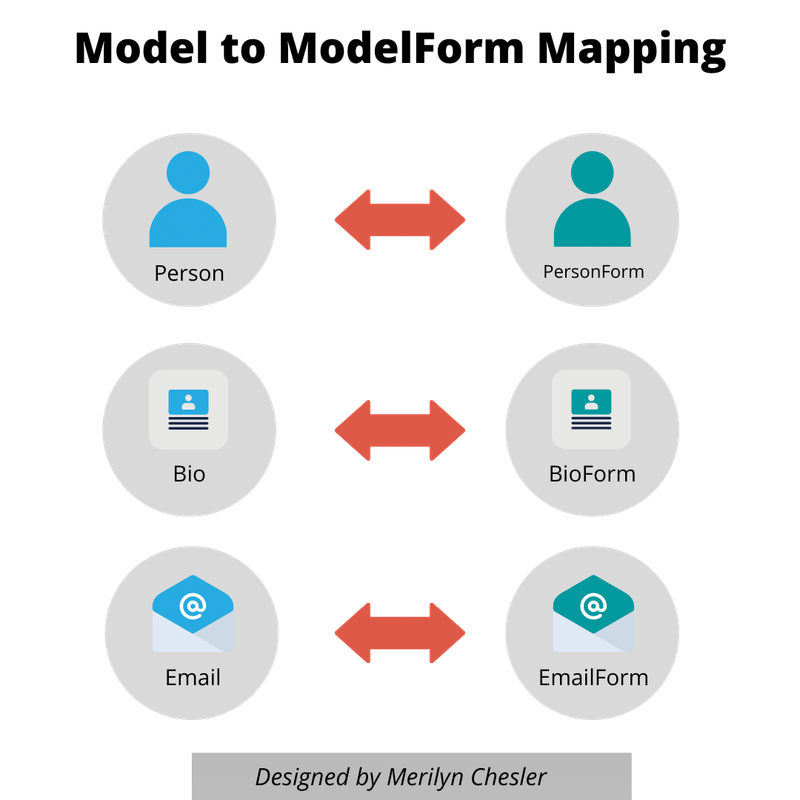
In Django, its MTV (Model-Template-View) architecture does not allow a template to know anything about a model. The template communicates directly with a view that defines what fields from a model will be presented on a template. The UpdateView is perfect for a single Django model but it is not a solution for implementing multiple models. To do this, we need to create a view that can handle multiple forms. Luckily, Django provides a ModelForm class that lets us map a model to a form.
In a nutshell, the steps we need to take are:
- Create ModelForm for each Model
- Create a view to house multiple ModelForms
- Define a
get_context_data()method in the view to display this view on a template - Define a
post()method in the view to process input from each of the forms in the template
In our demo app that plans tasks and meetings, we want to continue to focus on only three models - Person, Bio and Email for now. We want to be able to create forms for each of them so that we can have three distinct ModelForm subclasses.
We would create Django Form classes inside a special file called forms.py and let it reside in our apps directory. To create a distinct ModelForm class, we simply subclass from it. For example, the code for PersonModelForm will look like this:
# forms.py
from django import forms
from django.forms import ModelForm, TextInput
from planner.models import Person, Email, Bio

# This form is used in PersonDetailUpdateView in views.py
class PersonForm(ModelForm):
    class Meta:
        model = Person
        fields = '__all__'
Notice the similarity in the structure of a PersonForm to the PersonUpdateView class we created in our last article.
# views.py
from django.views.generic.edit import UpdateView
from planner.models import Person, Bio, Email

class PersonUpdateView(UpdateView):
    model = Person
    fields = '__all__'
    template_name_suffix = '_update_form'
There are properties of similar names, model and fields, in both types of classes. The PersonForm defines these properties inside an inner Meta class. When we construct a PersonForm, we need to pass a Person model instance as a value to the key, instance, in the constructor. For example:
from planner.forms import PersonForm

person = Person(name='Raya', age=40, status='BUSY')
person_form = PersonForm(instance=person)
We would create a BioForm for Bio and EmailForm for Email. For example:
class BioForm(ModelForm):
    class Meta:
        model = Bio
        fields = ['bio', 'image']

class EmailForm(ModelForm):
    class Meta:
        model = Email
        # fields = '__all__'
        fields = ['address']
If you would like a refresher on why we assign certain fields to BioForm and EmailForm, please refer to our last article. Next, we create a view to house our ModelForms.
We are going to use one of Django's generic based-views to subclass from. Remember, we can't use a DetailView because this type of view is mapped to a Django model. Since we need a view that can encapsulate multiple models, I decide to subclass from TemplateView, which renders a template based on value(s) captured from the url and passes back information to the template in a rendering context.
I call this view, PersonDetailUpdateView, since the purpose of this view is to allow users to update selected fields corresponding to the three models we support. For example:
class PersonDetailUpdateView(TemplateView):
    template_name = 'planner/person_detail_update_form.html'
Notice that for this type of view, we need to specify the corresponding template file name. It's best to be explicit about where this template is located so that Django will pick up the correct template for our app. Next, we need to define a method, get_context_data() for this view.
We overload the get_context_data() method so that we can encapsulate data from our multiple ModelForm subclasses in the rendering context. For example:
class PersonDetailUpdateView(TemplateView):
    template_name = 'planner/person_detail_update_form.html'

    def get_context_data(self, **kwargs):
        context = super().get_context_data(**kwargs)
        person = get_object_or_404(Person,pk=self.kwargs['pk'])
        context['person'] = person
        context['person_form'] = PersonForm(instance=person)
        context['bio_form'] = BioForm(instance=person.bio)
        context['email_form'] = EmailForm(instance=person.email)

        return context
The first thing we do inside get_context_data() is to retrieve the rendering context so that we can fill it with data. We save this context inside the variable, context. Recall that context is a Python dictionary with key-value pairs. In this view, we expect a pk parameter to be passed inside a url, so that we can retrieve the correct Person model instance. We save this model instance inside the variable, person. We then save person inside our context. In the the next few steps we create our various ModelForm subclasses - PersonForm, BioForm and EmailForm mapped to the model instances for Person, Bio and Email respectively and save them inside the context as well. We then return the context.
The url path defined to display this view in urls.py for our app is as follows:
urlpatterns = [
    ...
    path('person/<int:pk>/edit', PersonDetailUpdateView.as_view(), name='person_detail_update_form'),
]
The content of our person_detail_update_form.html may look like this:
{% extends "planner/base.html" %}
{% block title %}{{ title }}{% endblock title %}
{% block content %}
<h1>Information about <a href="{% url 'planner:person_detail' person.pk %}">{{ person.name }}</a></h1>
<form method="post">
  {% csrf_token %}
  <table>
  {{ person_form }}
  </table>
  <br>
  <button name="save_person">Save</button>
</form>
<form method="post">
  {% csrf_token %}
  <table>
  {{ bio_form }}
  </table>
  <br>
  <button name="save_bio">Save</button>
</form>
<form method="post">
  {% csrf_token %}
  <table>
  {{ email_form }}
  </table>
  <br>
  <button name="save_email">Save</button>
</form>
{% endblock content %}
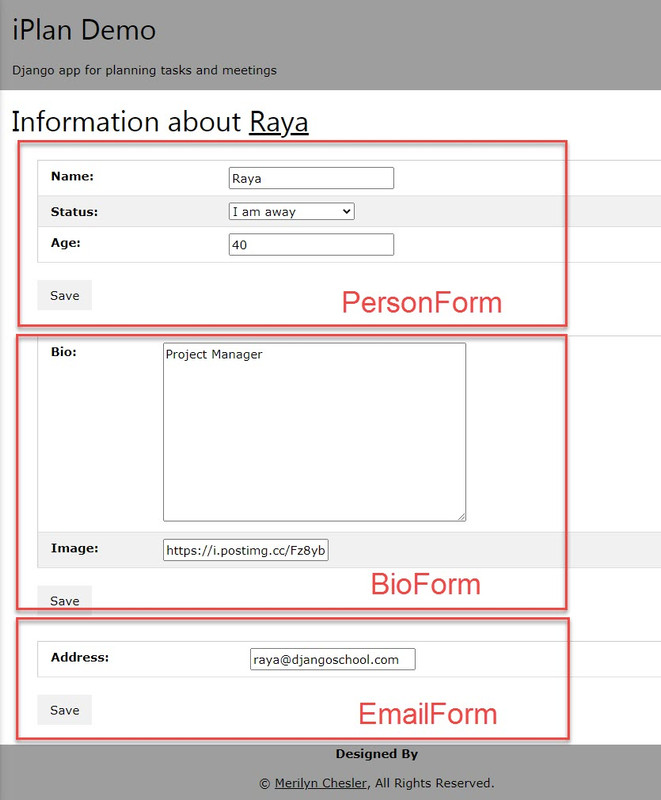
Notice that we name the Save button for each form with a distinct name, such as save_person, save_bio and save_email. This will be helpful later when we process the form in our view to distinguish the origin of each Http POST request. When rendered, we will see something like this:
We need to define a post() method to handle the Http POST request from each form. Luckily, Django provides methods to check if our form has data (.is_bound) and whether the data is valid (.is_valid()). If a form is empty, .is_bound will return False. But before we can use these methods, we need to create ModelForms inside our .post() method based on the model instance and data received from the Http POST request.
In pseudocode, our steps to execute are as follows:
- Retrieve the primary key,
pk, from the keyword argument passed to the url. - Retrieve the
Personmodel instance from the database based on thepkand save it inperson. - Create
PersonForminstance based onpersonand theHttp POSTrequest data and save it inperson_form. - Create
BioForminstance based onperson.bioand theHttp POSTrequest data and save it inbio_form. - Create
EmailForminstance based onperson.emailand theHttp POSTrequest data and save it inemail_form. - Determine which form this
Http POSTrequest is from -PersonForm,BioFormorEmailFormby detecting if the button name -save_person,save_bioorsave_emailexist in theHttp POSTrequest data. We check the.is_boundand.is_valid()properties for eachModelForm. If a form is valid, we either:
- Save the form with
.save()and create a success message, or - Create an error message.
- Redirect the template to the same page.
For example:
def post(self, request, *args, **kwargs):
  # retrieve the primary key from url
  pk = self.kwargs['pk']

  # retrieve the Person model instance based on pk
  person = get_object_or_404(Person, pk=pk)

  # create a PersonForm based on person and form data
  person_form = PersonForm(instance=person, data=request.POST)

  # retrieve the Bio model instance based on person's pk
  bio = get_object_or_404(Bio, person__pk=pk)

  # create a BioForm based on bio and form data
  bio_form = BioForm(instance=bio, data=request.POST)

  # retrieve the Email model instance based on person's pk
  email = get_object_or_404(Email, person__pk=pk)

  # create a EmailForm based on email and form data
  email_form = EmailForm(instance=email, data=request.POST)

  # if the save_person button is pressed
  if 'save_person' in request.POST:
    if person_form.is_bound and person_form.is_valid():
      person_form.save()
      messages.add_message(request, messages.SUCCESS, "%d %s %d %s" %(person.pk, person.name, person.age, person.status))
    else:
      messages.error(request, person_form.errors)

  # if the save_bio button is pressed
  elif 'save_bio' in request.POST:
    if bio_form.is_bound and bio_form.is_valid():
      bio_form.save()
      messages.add_message(request, messages.SUCCESS, '%d %s %s saved' %(bio.person.pk, bio.bio, bio.image))
    else:
      messages.error(request, bio_form.errors)

  # if the save_email button is pressed
  elif 'save_email' in request.POST:
    if email_form.is_bound and email_form.is_valid():
      email_form.save()
      messages.add_message(request, messages.SUCCESS, '%d %s' %(email.person.pk, email.address))
    else:
      messages.error(request, email_form.errors)

return HttpResponseRedirect(reverse('planner:person_detail_update_form', kwargs={'pk': self.kwargs['pk']}))This article illustrates a common use-case of an application that needs to collect data from multiple forms corresponding to models in a webpage. By leveraging Django's generic base views such as TemplateView and ModelForm class, we are able to implement a clean solution. If you have any questions, please comment below. Otherwise, thank you for reading and happy Django!


